Quick One-Pot Beef Chili Macaroni for Busy Weeknights
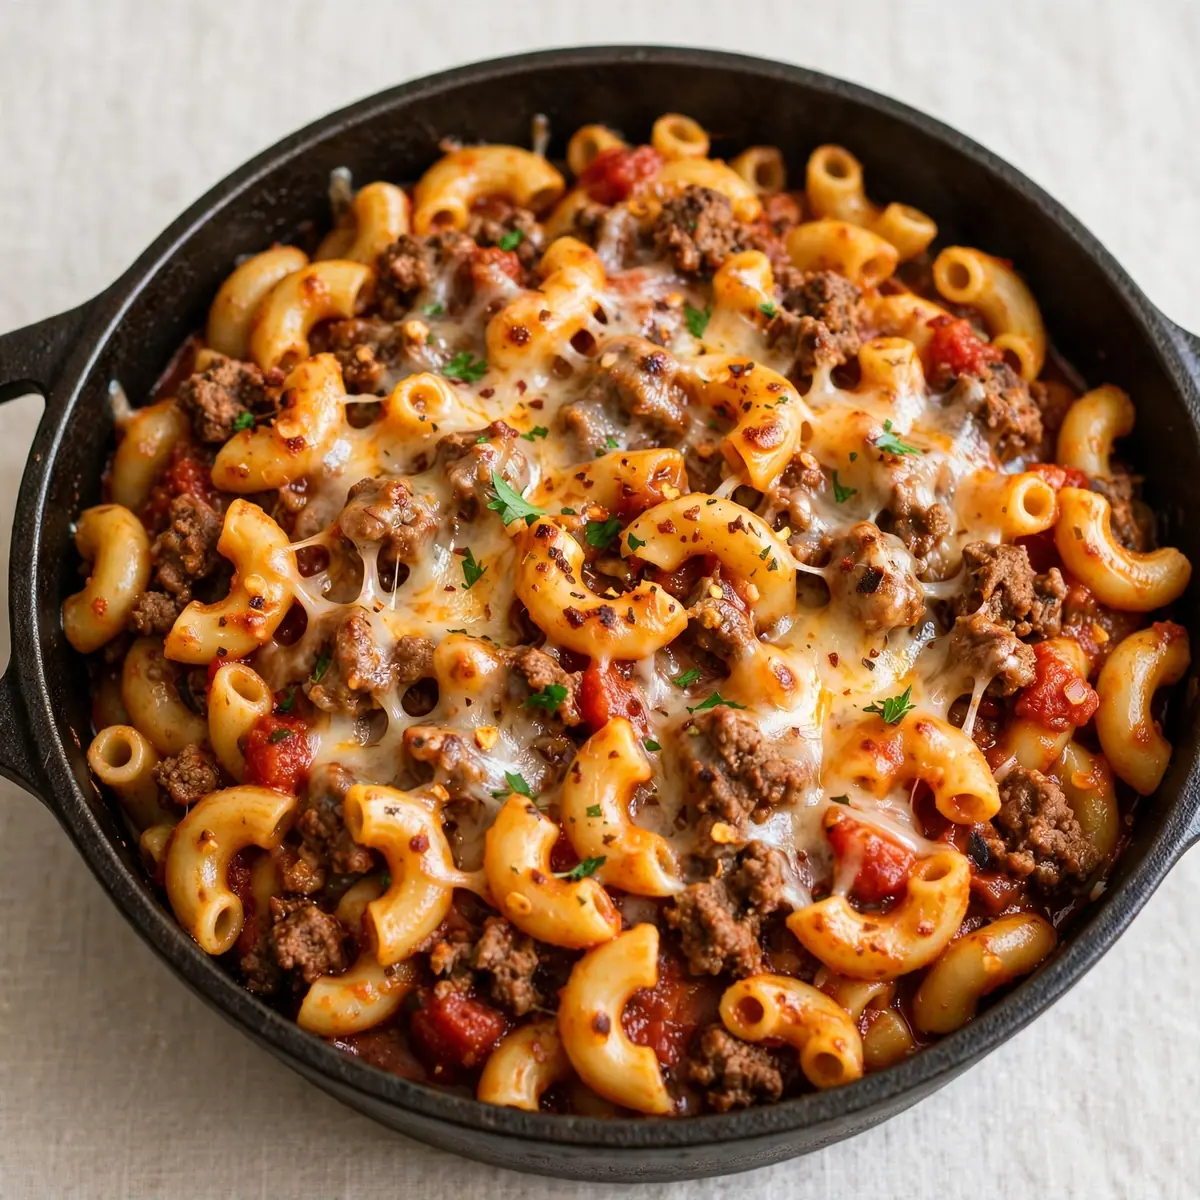
I remember the evening I first made this one-pot beef chili macaroni. It was a Tuesday, the kids were restless, and I had exactly thirty minutes to get dinner on the table. I stumbled upon this combination by accident, and it’s been a hit ever since. This recipe is the answer for every busy family looking for a hearty, flavourful meal without the mountain of washing up.
Recipe Overview
- Prep Time: 10 minutes
- Cook Time: 25 minutes
- Total Time: 35 minutes
- Servings: 4-6
- Difficulty: Easy
Why You’ll Love This One-Pot Beef Chili Macaroni
- One Pot, No Fuss: Everything cooks in a single deep pan, so you spend less time scrubbing and more time with your family.
- Ready in Under 35 Minutes: From the moment you start chopping the onion to the moment you serve it, this dinner moves fast.
- Packed with Protein and Veg: The beef and beans make it filling, while the tomatoes and peppers sneak in some goodness without anyone complaining.
- Budget-Friendly Ingredients: Most items are pantry staples or inexpensive fresh produce, making this a smart choice for a midweek meal.
- Make-Ahead Magic: It reheats beautifully, so you can cook it once and enjoy it for lunch or another dinner later in the week.

Ingredients You’ll Need
- 1 tablespoon olive oil
- 1 large onion, finely chopped
- 2 cloves garlic, minced
- 500g beef mince
- 1 red bell pepper, diced
- 2 tablespoons tomato purée
- 1 teaspoon smoked paprika
- 1 teaspoon ground cumin
- 1 teaspoon dried oregano
- 400g can chopped tomatoes
- 400g can kidney beans, drained and rinsed
- 500ml beef stock
- 200g dried macaroni
- Salt and black pepper, to taste
- 100g grated cheddar cheese, for serving
Tip: For the best texture, use a lean beef mince (around 5% fat) so you don’t have to drain off excess grease mid-cook. If you use a fattier mince, simply spoon off the fat after browning.
How to Make One-Pot Beef Chili Macaroni
- Sauté the aromatics: Heat the olive oil in a large frying pan or deep skillet over a medium heat. Add the chopped onion and cook for 3-4 minutes until it turns translucent and smells sweet. Stir in the minced garlic and cook for another 30 seconds until fragrant — you’ll notice the garlic scent fills the kitchen.
- Brown the beef: Increase the heat to medium-high and add the beef mince. Break it up with a wooden spoon as it cooks. You’re looking for the mince to turn a deep brown colour, with no pink remaining. This takes about 5-6 minutes. The sizzling sound will quieten as the moisture evaporates, and the meat will start to crisp slightly at the edges.
- Add the vegetables and spices: Toss in the diced red bell pepper and stir for 2 minutes until it softens. Sprinkle over the smoked paprika, ground cumin, and dried oregano. Stir everything well so the spices coat the beef and peppers. You’ll see the red from the paprika stain the meat, and the smell will become warm and smoky.
- Build the sauce: Spoon in the tomato purée and stir for 1 minute — it will darken in colour as it cooks. Pour in the chopped tomatoes, the drained kidney beans, and the beef stock. Give everything a good stir, scraping the bottom of the pan to release any browned bits. The liquid should look deep red and smell rich.
- Cook the macaroni: Bring the mixture to a gentle boil, then stir in the dried macaroni. Reduce the heat to a simmer, cover the pan with a lid, and let it cook for 10-12 minutes. Stir halfway through to prevent the pasta from sticking. The macaroni will absorb the liquid and swell, and the sauce will thicken to a glossy, velvety consistency. When a piece of pasta feels tender when pressed against the side of the pan, it’s done.
- Season and rest: Remove the pan from the heat. Taste the chili macaroni and adjust the seasoning with salt and black pepper. Let it sit uncovered for 2 minutes — the sauce will continue to thicken as it rests. You’ll see steam rising and the surface will look slightly glossy.
- Serve with cheese: Spoon generous portions into bowls and top with grated cheddar cheese. The cheese will melt from the residual heat, creating a creamy, golden layer over the top. Serve immediately.
Tips From My Kitchen
- Use the right pan: A large, deep frying pan or a Dutch oven works best. You need enough surface area for the liquid to simmer and the pasta to cook evenly. If the pan is too small, the macaroni will clump together and cook unevenly. I use a 30cm skillet with high sides, and it’s perfect.
- Don’t skip the tomato purée step: Cooking the tomato purée for a full minute before adding the liquid deepens the flavour. It caramelises slightly, which adds a subtle sweetness and a richer colour to the final dish. I used to struggle with this dish until I discovered this technique, and now I never skip it.
- Stir the pasta halfway through: After about 5 minutes of simmering, lift the lid and give the mixture a good stir. This prevents the macaroni from sticking to the bottom of the pan and ensures every piece cooks evenly. You’ll notice the pasta is already starting to soften, and the sauce will look thicker.
- Adjust the liquid as needed: Different brands of pasta absorb liquid at different rates. If the sauce looks too thick before the pasta is tender, add a splash more stock or water. If it looks too thin after the pasta is cooked, simmer uncovered for an extra minute or two. Trust your eyes — the sauce should coat the back of a spoon.
- Make it ahead for busy days: This dish actually tastes better the next day because the flavours have time to meld. Allow it to cool completely, then transfer to an airtight container and refrigerate for up to 3 days. To reheat, add a splash of water or stock and warm it gently on the hob or in the microwave. The texture remains just as good as the first day.
- Freeze for future meals: Portion the cooled chili macaroni into freezer-safe containers and freeze for up to 3 months. Thaw overnight in the fridge before reheating. This is a lifesaver for those evenings when you have no energy to cook.
Equipment You’ll Need
- Large frying pan or deep skillet with a lid
- Sharp knife and cutting board
- Mixing bowls for holding ingredients
- Wooden spoon or spatula for stirring
- Measuring spoons and a liquid measuring jug
Delicious Variations to Try
- Spicy Version: Add one finely chopped red chilli along with the garlic, or stir in a teaspoon of chilli flakes with the smoked paprika. For extra heat, serve with sliced fresh jalapeños on top. The warmth builds gradually without overwhelming the other flavours.
- Vegetarian/Vegan Option: Replace the beef mince with 400g of cooked green lentils or a plant-based mince alternative. Use vegetable stock instead of beef stock, and omit the cheese or use a dairy-free version. The lentils hold their shape well and soak up the smoky spices beautifully.
- Different Protein: Swap the beef mince for turkey mince or diced chicken thigh. Turkey mince cooks in a similar way, while chicken thighs add a richer flavour. If using chicken, cook it for an extra 2 minutes to ensure it’s fully done before adding the liquids.
What to Serve With One-Pot Beef Chili Macaroni
- A crisp green salad with a tangy vinaigrette — try our Quick Weeknight Everything Green Salad With Avocado Dressing for a fresh, creamy contrast.
- Warm crusty bread or garlic toast to mop up the rich sauce.
- A side of steamed greens, such as broccoli or green beans, for an extra veggie boost.
- Simple sliced avocado and a squeeze of lime juice for a fresh, zesty finish.
Still hungry for ideas? You might also love One Pot Easy Chili Recipe In 30 Minutes, Classic Beef Pot Roast With Gravy from our sister kitchens.
Frequently Asked Questions
One-Pot Beef Chili Macaroni
Ingredients
Method
- Sauté the aromatics: Heat the olive oil in a large frying pan or deep skillet over a medium heat. Add the chopped onion and cook for 3-4 minutes until it turns translucent and smells sweet. Stir in the minced garlic and cook for another 30 seconds until fragrant — you'll notice the garlic scent fills the kitchen.
- Brown the beef: Increase the heat to medium-high and add the beef mince. Break it up with a wooden spoon as it cooks. You're looking for the mince to turn a deep brown colour, with no pink remaining. This takes about 5-6 minutes. The sizzling sound will quieten as the moisture evaporates, and the meat will start to crisp slightly at the edges.
- Add the vegetables and spices: Toss in the diced red bell pepper and stir for 2 minutes until it softens. Sprinkle over the smoked paprika, ground cumin, and dried oregano. Stir everything well so the spices coat the beef and peppers. You'll see the red from the paprika stain the meat, and the smell will become warm and smoky.
- Build the sauce: Spoon in the tomato purée and stir for 1 minute — it will darken in colour as it cooks. Pour in the chopped tomatoes, the drained kidney beans, and the beef stock. Give everything a good stir, scraping the bottom of the pan to release any browned bits. The liquid should look deep red and smell rich.
- Cook the macaroni: Bring the mixture to a gentle boil, then stir in the dried macaroni. Reduce the heat to a simmer, cover the pan with a lid, and let it cook for 10-12 minutes. Stir halfway through to prevent the pasta from sticking. The macaroni will absorb the liquid and swell, and the sauce will thicken to a glossy, velvety consistency. When a piece of pasta feels tender when pressed against the side of the pan, it's done.
- Season and rest: Remove the pan from the heat. Taste the chili macaroni and adjust the seasoning with salt and black pepper. Let it sit uncovered for 2 minutes — the sauce will continue to thicken as it rests. You'll see steam rising and the surface will look slightly glossy.
- Serve with cheese: Spoon generous portions into bowls and top with grated cheddar cheese. The cheese will melt from the residual heat, creating a creamy, golden layer over the top. Serve immediately.
Notes
I hope this one-pot beef chili macaroni becomes a regular in your weeknight rotation, just as it has in mine. It’s the kind of meal that brings everyone to the table without stress, and I love hearing how it works for other families. If you try it, drop a comment below and let me know how it turned out — or if you came up with your own twist. Happy cooking!